Making an Excel worksheet might seem tricky if you’re new to it. But don’t worry! Excel helps you keep your info neat. If you’re a beginner or need some help, this guide is here for you. We’ll teach you the basics like how to create, delete, insert, and hide stuff in Excel. It’ll make making spreadsheets in Excel easy. Follow along, and you’ll learn how to create a new Excel sheet and see how Excel makes info easy to handle. Let’s get started and learn!
What is an Excel Worksheet?
An Excel worksheet is like a handy tool to work with numbers and information. Excel worksheet is made up of rows and columns where you can put your data. It’s great for keeping things neat and organized.
With Excel, you can do all sorts of things with your data, like adding, subtracting, and organizing it just the way you want. It’s super useful for business tasks.
Now, let’s see how to make a new Excel worksheet.
How to Create an Excel Worksheet?
Creating a new Excel worksheet is easy! Just follow these steps: When you open Excel, you’ll see various options like “Welcome to Excel” and “Drop-Down Tutorial” by default.
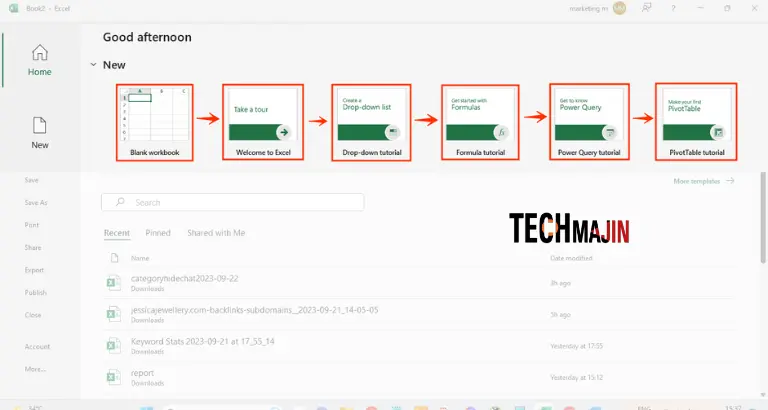
To create a new worksheet, select the one that suits your needs. For this tutorial, choose “Blank workbook.” A blank worksheet will appear, as shown below:

This is the way you can create new excel worksheet. Now, you’re ready to start working with your new Excel worksheet!
Insert a New Excel Worksheet
Adding a new Excel worksheet to an existing workbook is a useful skill that beginners often overlook. Excel workbooks are collections of these worksheets. If you’re wondering how to insert a new Excel worksheet into an existing one, follow these steps and refer to the accompanying images:
1. To insert a new Excel worksheet into an existing sheet, simply right-click on the existing sheet and then click on the “Insert” button.
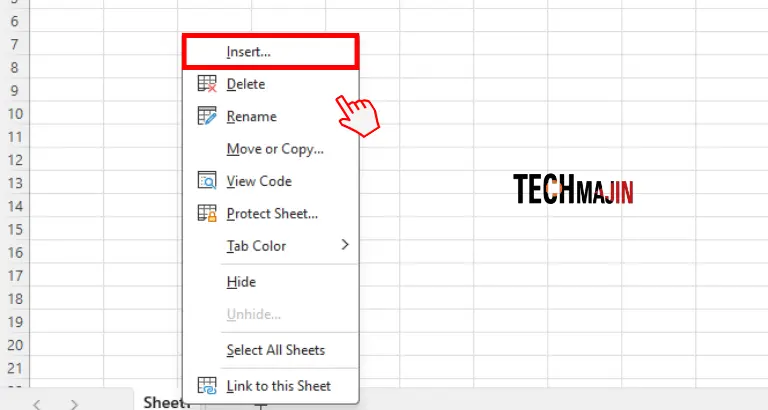
2. After clicking “Insert,” you’ll see several options, such as “Worksheet,” “Chart,” “MS Excel 4.0 Macro,” “International Macro Sheet,” and more. To add a new Excel worksheet, click on “Worksheet” and then tap the “OK” button, as shown below.
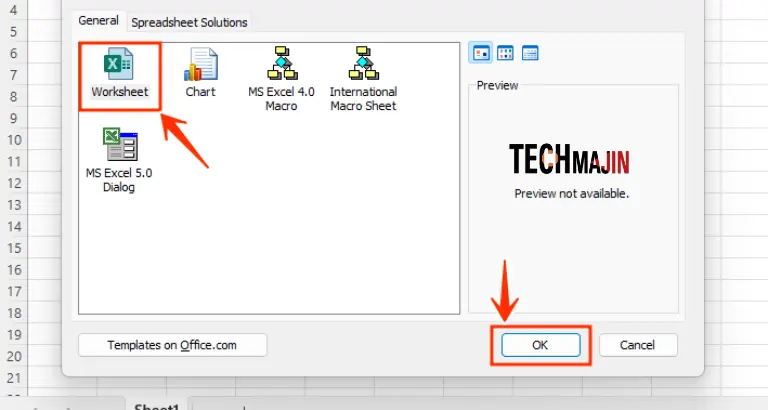
At the end of these steps, you’ll have a new Excel worksheet seamlessly inserted into your existing workbook. Now you have successfully learned how to insert a new Excel worksheet into an existing one.
How to Rename Excel Worksheet
By default, your sheets are named Sheet 1, Sheet 2, and so on. To change a sheet’s name in Excel, follow these simple steps:
- Right-click on the sheet you want to rename. A menu with options like Insert, Delete, and Rename will appear. Click on Rename.
- Now, you’ll see an option to edit the name of your Excel worksheet, as shown in the picture below.
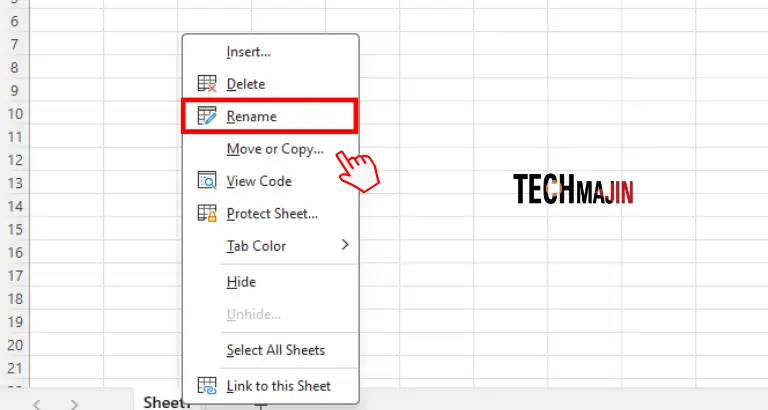
That’s it! You’ve successfully renamed your Excel worksheet in just a minute.
How to Delete Excel Worksheet
If you want to delete an Excel worksheet for any reason, follow these simple steps:
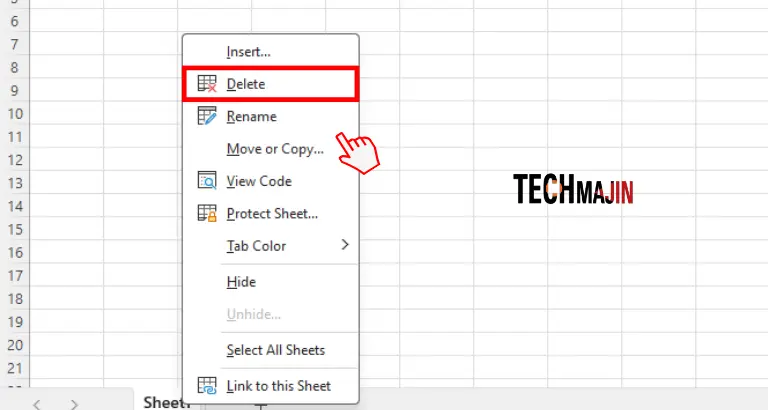
- Right-click on either “Sheet1” or the worksheet tab.
- Click on the “Delete” option.
This will delete the Excel worksheet you no longer need.
Hide/Unhide Excel Worksheet
If you have important information in an Excel worksheet that you want to keep hidden from others, you can do so easily within a minute. Here’s how:
How to Hide an Excel Worksheet:
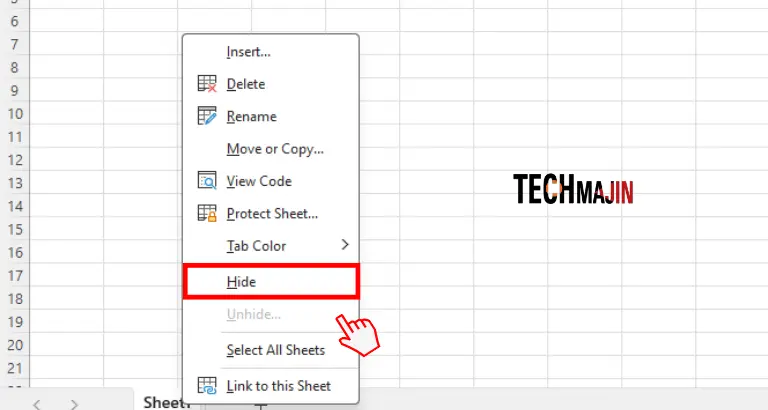
- Right-click on “Sheet 1.”
- Click on “Hide” in the navigation menu, as shown below:
How to Unhide an Excel Worksheet:
If you want to reveal the hidden Excel worksheet, follow these steps:
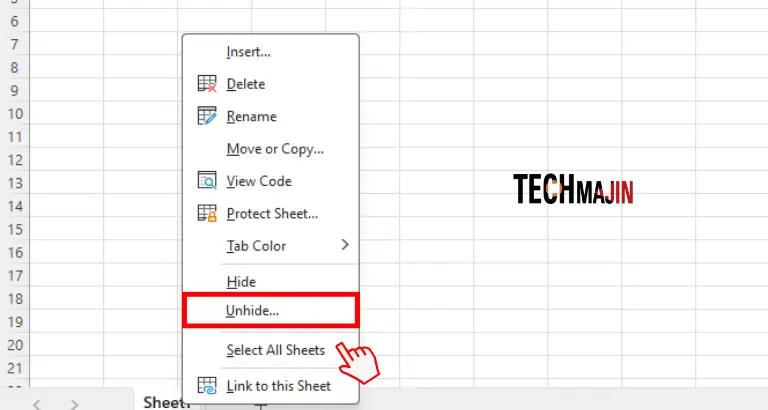
- Right-click on Sheet1.
- Select the “Unhide” option.
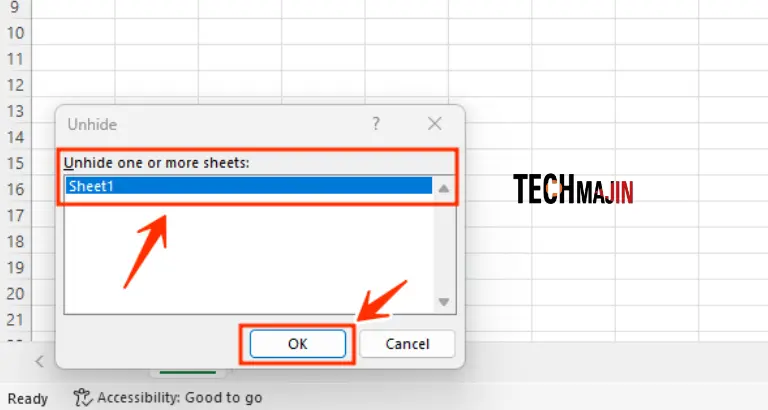
- A window will appear, allowing you to choose which sheet to unhide.
- Choose the desired sheet to unhide and click the “OK” button.
This will help you manage the visibility of your Excel sheets effectively.
How to Move or Copy an Excel Worksheet
To copy or move an Excel worksheet, right-click on the ‘Sheet1’ tab. A dialogue box will appear; select the ‘Move or Copy’ option from this box.
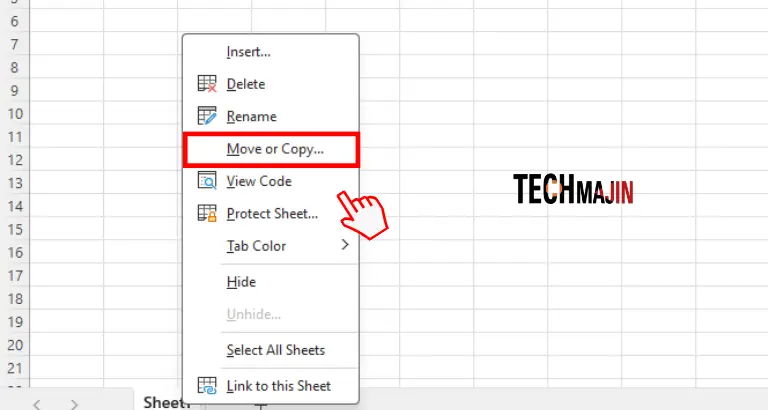
After selecting the ‘Move or Copy’ option, another dialogue box will open, presenting various options. You can choose where to copy or move the new worksheet and decide whether to position your sheet to the left or right.
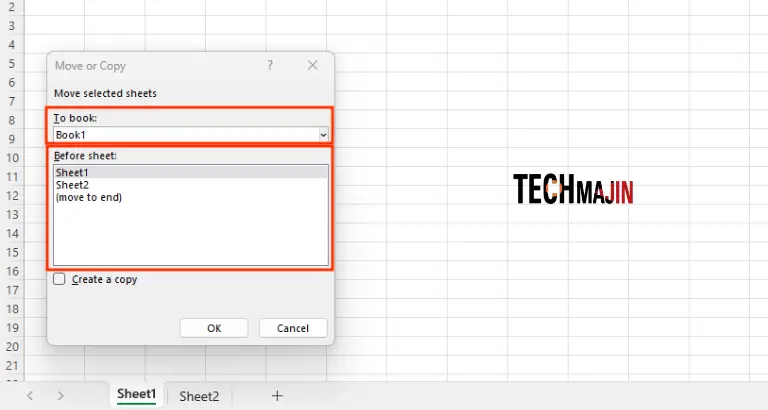
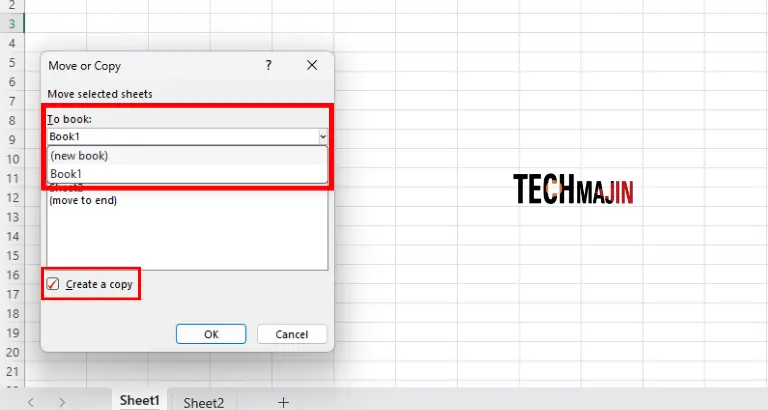
When you choose the first option, two new options will appear: ‘New Book’ or ‘Current Workbook’. Select according to where you need to copy or move the Excel worksheet. If you want to copy the sheet, ensure to tick the “Create a Copy” option.
If you wish to move the sheet from left to right or right to left, choose the “Before Sheet” option and select the name of the sheet where you want to place your sheet.
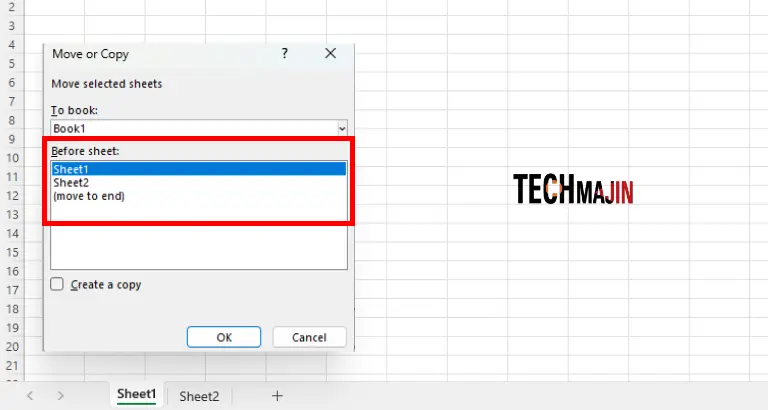
This is how you can move or copy your workbook from one Excel sheet to another.
How to Protect Cells in Excel Worksheet
To protect cells within an Excel worksheet, follow these steps:
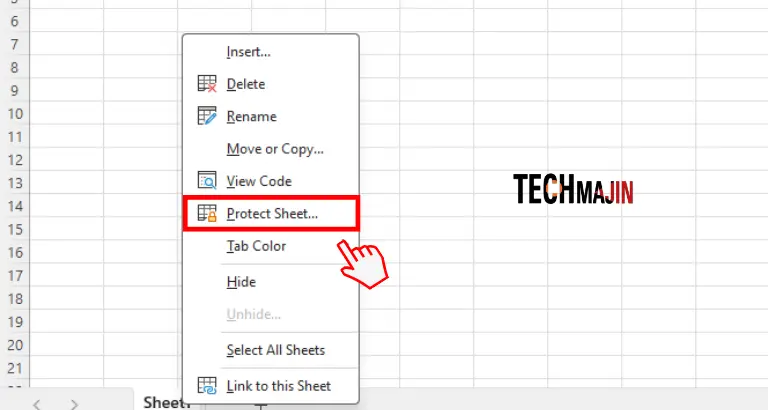
- Right-click on ‘Sheet1’.
- A dialogue box will appear.
- Select the ‘Protect Sheet’ option, as illustrated below:
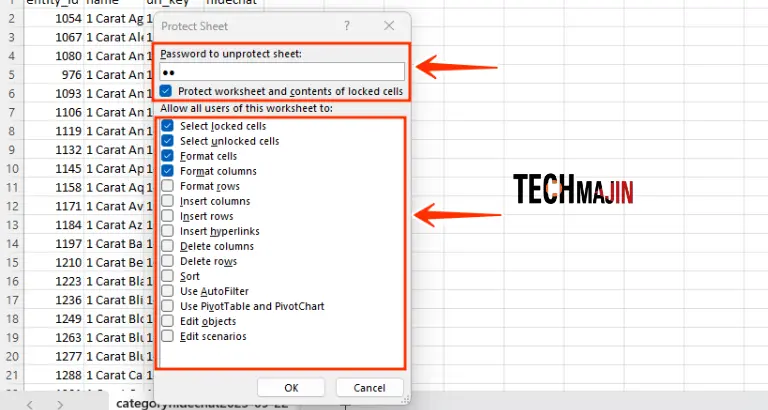
You will then be presented with numerous options that allow you to control what can be modified on the sheet, such as ‘Format Rows,’ ‘Insert Rows,’ ‘Insert Hyperlinks,’ ‘Delete Columns,’ ‘Delete Rows,’ and so forth. Select the options that suit your needs. Additionally, you can set a password to secure the worksheet.
How to Unprotect Sheet in Excel Worksheet
To unprotect a sheet in Excel, follow these steps:
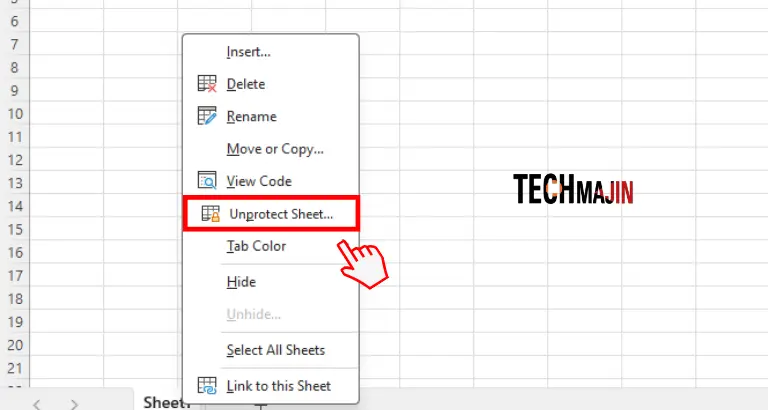
- Click on ‘Sheet1’.
- Select the ‘Unprotect Sheet’ option, as illustrated below:
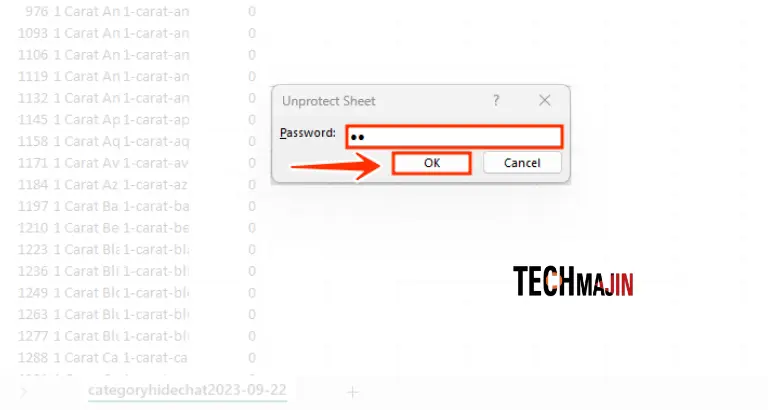
If you set a password at the time of protection, you will need to enter it again. Once entered, you will be able to unprotect the Excel sheet swiftly.
In the End.
Knowing how to make a new Excel sheet is really important. This guide shows you easy steps to create your own sheet that suits your needs. When you learn the basics, it helps you organize your data, work faster, and understand your information better. This simple knowledge makes working with data easy and lets you do more cool things with Excel.
FAQs
What is the shortcut to create a new sheet in the Excel workbook?
To create a new sheet in the Excel workbook use this shortcut key
- On Windows: Shift + F11
- On Mac: Shift + Fn + F11
What is the shortcut key to Add a column in Excel?
To add a column in excel you can use this shortcut key
- For Windows:- “ALT + H + I + C”
- For Mac:- “CTRL + SHIFT + =”


