Safety and security are paramount, especially when it comes to our digital devices. Whether you’re covering unfamiliar terrain, finding yourself in an emergency, or simply want peace of mind, knowing how to utilize the SOS feature on your iPhone can be valuable.
In this comprehensive guide, we will walk you through the steps to set up and activate SOS alerts on your iPhone, ensuring that you’re equipped with the tools to swiftly respond to emergencies and safeguard yourself and your loved ones.
Importance of SOS Alerts
SOS alerts play an important role in modern emergency response and public safety rules, offering a lifeline during crises. These alerts are designed to provide immediate assistance or information to people in critical situations, ranging from natural disasters to personal emergencies. Even when your iPhone cannot establish a regular connection, your iPhone will display an “SOS Only” message, which means you can still make emergency calls.
The importance of SOS alerts can be understood through its key features as follows:
- Quick Emergency Services Access
- Broad Information Dissemination
- Precise Location Sharing
- Enhanced Accessibility
- Assurance and Safety
- Efficient Aid Coordination
- Community Support Activation
In summary, SOS alerts are a fundamental part of emergency preparedness and response, enhancing the speed and efficiency of aid delivery, ensuring public safety, and providing support in critical situations.
Steps to Activate SOS on iPhone
Activating the SOS feature on an iPhone can quickly connect you to emergency services and notify your emergency contacts in critical situations. Here’s how to do it:
For iPhone 8 and Later Models:
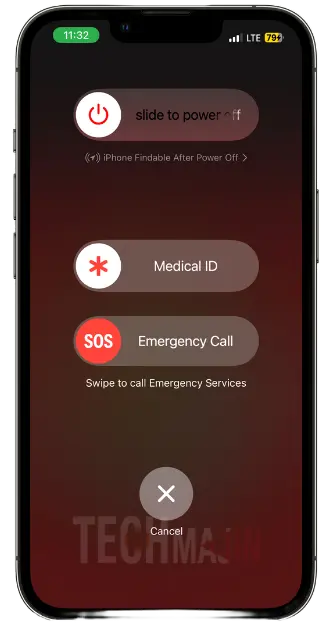
- Press and Hold: Simultaneously press and hold the side button and one of the volume buttons until the Emergency SOS slider appears.
- Slide to Call: Drag the Emergency SOS slider to call emergency services. If you continue holding the buttons instead of sliding, a countdown begins, and an alert sound plays.
- Automatic Call: If you hold the buttons until the countdown finishes, your iPhone automatically calls emergency services.
For iPhone 7 and Earlier:
- Rapid Button Press: Press the side (or top) button rapidly five times. The Emergency SOS slider will appear.
- Slide to Call: Slide the Emergency SOS slider to call emergency services.
After Activating SOS:
- Emergency Contacts Notification: After the call ends, your iPhone sends a text message with your current location to your emergency contacts (if you have set them up in the Health app). Your location is sent for a while, and updates if it changes.
- Canceling an SOS Call: If you start an SOS call by accident, you can cancel it. On iPhone 8 and later, release the buttons and tap “Stop” followed by “Stop Calling.” On iPhone 7 or earlier, tap the “Stop” button on the screen, then confirm by tapping “Stop Calling.”
Important Tips to Consider While Using SOS
- Configure SOS Settings: You can adjust SOS settings, like Auto Call and Countdown Sound, in the Settings app under Emergency SOS.
- Practice Caution: Familiarize yourself with how to activate and cancel SOS to avoid accidental emergency calls.
- Keep Updated: Ensure your iPhone’s software is up-to-date to access the latest SOS features and improvements.
How to Configure and Modify iPhone Emergency Contacts
Setting up and editing emergency contacts on your iPhone is a straightforward process that can be crucial in an emergency. These contacts are notified when you use the Emergency SOS feature on your iPhone. Here’s how to set up and edit them:
Set Up Emergency Contacts
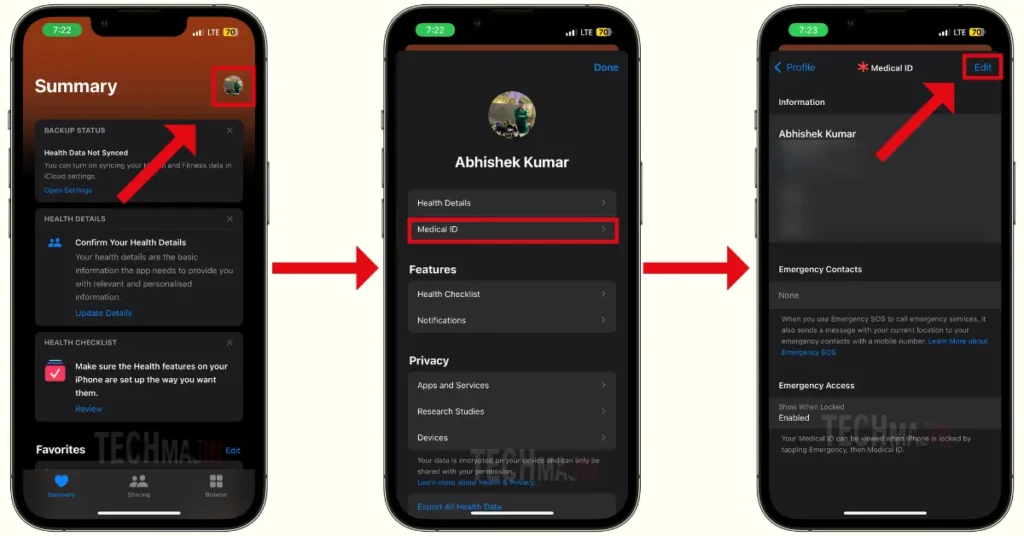
- Open the Health app: Start by opening the Health app on your iPhone. This app comes pre-installed on all iPhones.
- Tap Your Profile Picture: In the Health app, tap on your profile picture or your name in the top right corner of the screen.
- Access Medical ID: Tap on “Medical ID”. This section allows you to add medical information and emergency contacts.
- Edit Medical ID: Tap “Edit” in the top right corner. If you haven’t set up your Medical ID yet, you might need to create one by tapping “Create Medical ID”.
- Add Emergency Contacts: Scroll down to the “Emergency Contacts” section. Tap the green plus icon (“Add emergency contact”) to add a contact. Your iPhone will prompt you to choose a contact from your contacts list.
- Specify Relationship: After selecting a contact, you will be asked to specify their relationship to you. Choose the appropriate option from the list.
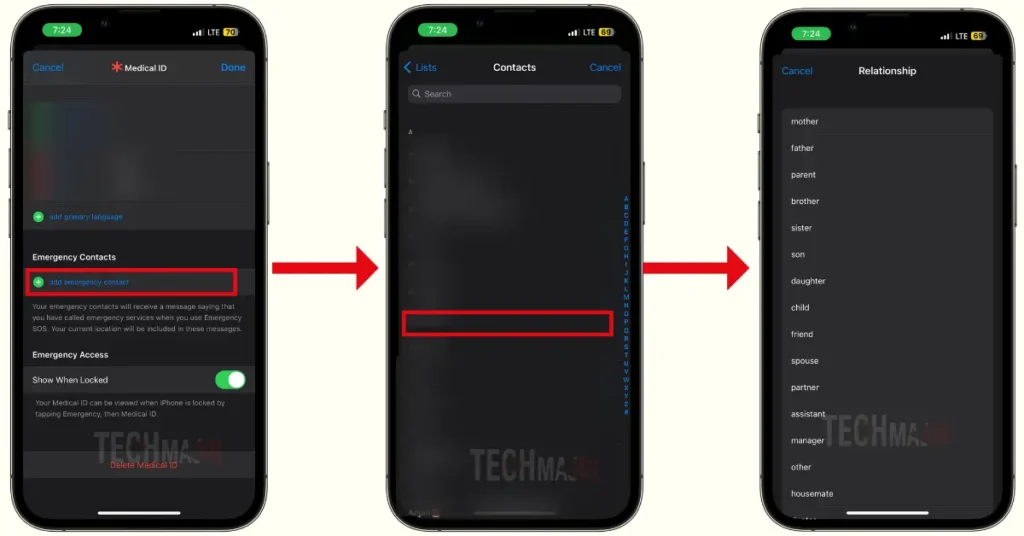
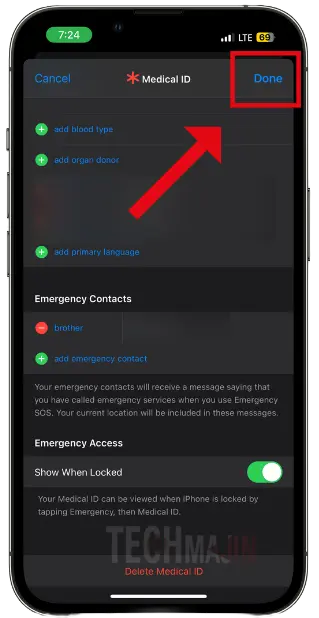
- Save: Once you have added all your emergency contacts, make sure to tap “Done” to save your changes.
Edit Emergency Contacts
To edit or remove existing emergency contacts, follow these simple steps:
- Access Medical ID for Editing: Follow the same steps to open the Health app, go to your profile, and tap “Medical ID”. Then, tap “Edit”.
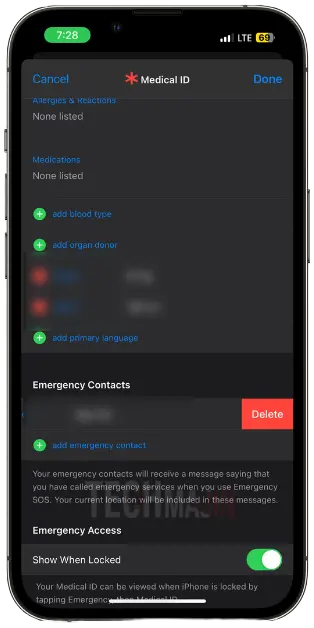
- Edit or Delete Contacts: To change the details of an emergency contact, tap on their name. You can then choose a different contact or change the relationship. To delete an emergency contact, tap the red minus icon next to their name, then tap “Delete”.
- Save Your Changes: After making your edits, tap “Done” to save any changes you’ve made.
Additional Tips
Here are some tips to consider while adding or editing emergency contacts to the SOS feature on your iPhone:
- Consider Accessibility: Choose emergency contacts who are likely to respond quickly in an emergency.
- Inform Your Contacts: Let your emergency contacts know that you have added them as such on your iPhone. This ensures they understand the potential importance of sudden calls or texts they might receive.
- Regular Updates: Regularly review and update your emergency contacts and Medical ID information to ensure it remains accurate and up-to-date.
Setting up emergency contacts on your iPhone is simple but important to enhance your safety and ensure your loved ones are quickly informed in case of an emergency.
How to Set Up Your Medical ID on an iPhone?
Setting up your Medical ID on an iPhone helps you ensure your safety in case of a medical emergency. Your Medical ID provides first responders with critical information such as allergies, medical conditions, and emergency contacts, even when your phone is locked. Here’s a step-by-step guide on how to set it up:
1. Open the Health App
Start by opening the Health app on your iPhone. This app comes pre-installed on all iPhones and features a white icon with a red heart.
2. Navigate to Your Medical ID
- Tap on your profile picture or your name in the top right corner of the screen.
- Select “Medical ID” from the menu. This option allows you to create and manage your Medical ID.
3. Create or Edit Your Medical ID
- If you haven’t set up your Medical ID yet, tap “Create Medical ID.”
- If you already have a Medical ID, tap “Edit” to update your information.
4. Enter Your Medical Information
- Fill in your health information carefully. You can include details such as your date of birth, medical conditions, medical notes, allergies and reactions, medications, blood type, whether you’re an organ donor, and more.
- It’s important to be thorough and accurate, as this information could be crucial in an emergency.
5. Add Emergency Contacts
- Scroll down to the “Emergency Contacts” section.
- Tap the green plus icon to add an emergency contact to your contacts list. You’ll need to specify the person’s relationship to you.
- You can add multiple emergency contacts. Choose people who are likely to respond in an emergency.
6. Enable Access When Locked
- Ensure the “Show When Locked” option is enabled. This allows your Medical ID to be accessed from the lock screen without needing your passcode.
- This step is crucial for ensuring that first responders can access your Medical ID even if your iPhone is locked.
7. Save Your Medical ID
- Once you’ve entered all your information, tap “Done” to save your Medical ID.
- After saving, your Medical ID can be accessed by swiping up on the lock screen and tapping “Emergency,” then “Medical ID.”
Setting up your Medical ID on your iPhone is a simple yet impactful way to enhance your safety.
Conclusion
Understanding and using the iPhone’s SOS feature is essential for quick emergency assistance. It’s a straightforward process that connects you to emergency services and informs your contacts during critical situations. Setting it up alongside your Medical ID ensures responders have vital health information at their fingertips. This knowledge not only enhances personal safety but also provides peace of mind, knowing help is just a few taps away.
FAQs
Q1: How do I set up SOS on my iPhone?
Go to Settings > Emergency SOS. You can adjust settings like Auto Call and set up your emergency contacts in the Health app under your Medical ID.
Q2: How do I activate SOS on an iPhone 8 or later?
To activate SOS on an iPhone 8 or later, press and hold the side button and one of the volume buttons until the Emergency SOS slider appears. Slide to call emergency services, or continue holding to auto-call.
Q3: How can I activate SOS on an iPhone 7 or earlier?
To activate SOS on an iPhone 7 or earlier, press the side (or top) button five times to bring up the Emergency SOS slider, then slide to call emergency services.
Q4: Will my emergency contacts be notified when I use SOS?
Yes, if you have set up emergency contacts in your Medical ID, they will be notified of your location after the emergency call ends.
Q5: Can I cancel an accidental SOS call?
Yes, you can cancel by tapping the stop button on the screen and confirming by tapping “Stop Calling” if you haven’t completed the call to emergency services.
Q6: Is it possible to change the SOS settings on my iPhone?
Yes, you can customize settings like Auto Call and Countdown Sound in Settings > Emergency SOS.
Q7: How do I add or edit emergency contacts for SOS?
Add or edit emergency contacts in the Health app under your Medical ID. Tap “Edit” and scroll to “Emergency Contacts” to make changes.
Q8: Does using SOS on my iPhone automatically share my location?
Yes, using SOS on your iPhone will automatically share your location as this feature shares your current location with emergency services and your emergency contacts if you have them set up.
Q9: Can I use SOS on my iPhone without unlocking it?
Yes, SOS can be activated from the lock screen by pressing the designated button for your iPhone model.
Q10: What should I do if I accidentally activate SOS on my iPhone?
If you accidentally activate SOS, you can cancel the call if it hasn’t been completed by following the on-screen instructions to stop the call.
| Other iPhone Guides: How to see blocked numbers on iPhone |